
The unexpectedly complex rabbit holes involved in making music playback a 1-click experience

All I wanted was to press a button and hear SomaFM Groove Salad through my home stereo. 🎵
What I got instead was six weeks of diving into AV receiver telnet commands, Raspberry Pi power mysteries, and NFC webhook proxies. Sometimes I spent an entire week debugging my Home Assistant setup only to discover I’d been using the wrong IP address the whole time 🤦♂️.
But here’s the thing: the journey is the reward. Sure, I could have just lived with telling Alexa to turn on my AV receiver, connect to it over Bluetooth, then asking it to play what I want. But then I wouldn’t have learned how UPNP broadcasts get mangled by WiFi bridge modes, or that a 2.2W Raspberry Pi can teach you more about power supply stability than any electrical engineering textbook.
This is the story of how a simple goal—press button, get music—led me down some of the most beautifully complex rabbit holes I’ve explored in years. And why that complexity is exactly the point. 🐰
Table of Contents
- The goal: family-friendly music at home
- Automating Pioneer AV receivers
- The internet radio disappointment
- Discovering piCorePlayer
- Setting up Lyrion Media Server
- Building the automation
- NFC triggers and webhook magic
- Making it beautiful
- What’s next for you
The goal: family-friendly music at home
Let me paint the picture of what I was trying to avoid:
“Alexa, turn on my AV receiver”
“OK” (receiver turns on)
“Alexa, connect to Bluetooth”
(Wait 10 looong seconds…) 🥱
“I’m having trouble connecting to… 🙄 beep-boop, connected to AV receiver”
“Alexa, play SomaFM Groove Salad”
“Playing Groove Salad from TuneIn” (finally!)
Multiply that by every family member, add the inevitable moments when someone gives up halfway through, and you’ll understand why I wanted something simpler. My goal was straightforward:
- One trigger (tap, click, whatever) kicks off an automation
- AV receiver turns on, switches to the right input, sets volume
- Music starts playing through my good speakers
Simple, right?
Automating Pioneer AV receivers with Home Assistant
My trusty Pioneer SC-LX88 from 2016 still sounds fantastic, so why replace it? (You can tell it’s vintage by their website’s self-signed SSL certificate that makes modern browsers unhappy 🔒)
Rabbit hole #1: Getting reliable AV receiver control
IR remotes are terrible for automation—no feedback, line-of-sight issues, and one family member walking by can ruin your perfectly timed command sequence. Fortunately, my receiver has Ethernet! And it speaks… wait for it… raw telnet commands over port 23. No SSH, no encryption, just good old 1970s networking protocols 📞.
But first, I had to solve the WiFi problem: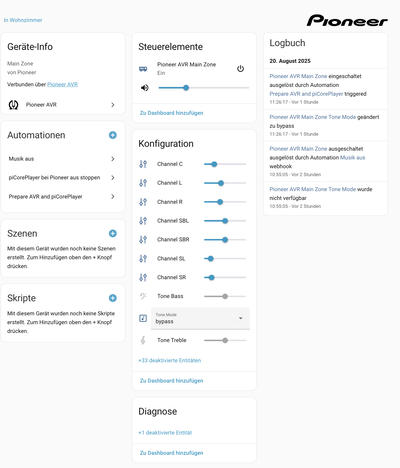
The WiFi bridge adventure: My receiver only has Ethernet, and running a cable wasn’t happening. Enter the TP-Link TL-WR802N portable router (€20). Sounds easy, right? Wrong! It took me asking Perplexity why UPNP wasn’t working to discover that the router’s default “Client Mode” mangles broadcast packets. Switch to “Range Extender” mode, and suddenly everything works perfectly ✨.
Home Assistant integration: The Pioneer Integration turns your ancient AV receiver into a modern smart device with full state management. Turn it off manually? Home Assistant knows. Change inputs? Home Assistant notices. It’s like giving your old hardware superpowers 🦸♂️.
Playing internet radio through my AV receiver: not so easy…
With the receiver automated, time for the easy part: playing internet radio.
Rabbit hole #2: The great internet radio disappointment
vTuner’s quiet death: In theory, there’s an “Internet Radio” input I used for this. Turns out that in practice, vTuner, the service powering it, silently discontinued support for Pioneer receivers. One week of debugging “why won’t this work anymore?” led to forum posts confirming my receiver had been abandoned 💀.
DLNA: theoretically easy, practically painful: My receiver supports DLNA, there’s a Home Assistant DLNA integration, and it should Just Work™. Except Pioneer’s DLNA implementation seems to have been only loosely written according to specs. Random disconnects, mysterious failures, and the WiFi bridge broadcast issues mentioned before made me lose trust quickly 😕.
Enter piCorePlayer—the rabbit hole that brought salvation to my audio playing needs.
piCorePlayer—a free, open source audio player system for Raspberry Pi
I miss my old Roku SoundBridge from 2003! That thing was bulletproof until Roku discontinued it. Ironically, I replaced it with the Pioneer’s built-in internet radio… which also got discontinued. There’s a pattern here 📱➡️🪦.
piCorePlayer is like a resurrection of the good old days: a minimal Linux distribution running entirely in RAM, featuring Squeezelite (an open source music player) and optional Lyrion Music Server integration. It’s basically an open source Logitech Squeezebox—the very thing that competed with my beloved SoundBridge back in the day!
My hardware shopping list (aka learning from past mistakes):
- Raspberry Pi 3B+: Because I had one lying around (like every good nerd 🤓)
- Geekworm aluminum passive cooling case: Because who needs fans when physics works?
- DSD Tech USB to Toslink adapter: Because HDMI is too smart for its own good
Why Toslink over HDMI? After days of HDMI negotiation hell—sometimes the TV is detected, sometimes not, sometimes the Pi boots, sometimes it sulks—I wanted something bulletproof. Toslink is optical (no grounding issues), lossless, and delightfully dumb. It either works or it doesn’t, no negotiation required 🔌.
The power supply saga 🔋:
Remember those random boot failures I mentioned? Took me a week of intermittent testing to spot that tiny “undervoltage” warning flashing on the TV screen during startup. Classic mistake: assuming any USB charger would work. The official Raspberry Pi power supply fixed it instantly. Sometimes the official accessories exist for good reasons!
Even with proper power, the USB sound card sometimes caused boot failures (probably power draw spikes during initialization). Setting the Pi to permanent low-power mode solved that too.
Power management bonus round: Since piCorePlayer runs entirely in RAM, it’s completely safe to just cut power. No graceful shutdowns needed! So I added a Tapo P115 smart plug for automated power management. The system draws 2.2W when running (about €7.50/year), and the smart plug only uses 0.6W when idle. Math is beautiful when it justifies your automation obsession 📊.
Lyrion Media Server
Lyrion Music Server, the open source successor to Logitech Media Server, and the brain behind piCorePlayer, handles local music libraries, internet radio plugins (including a dedicated SomaFM plugin! 🎧), and all the metadata management.
You can run LMS directly on the Pi, but that requires persistent storage and proper shutdowns. Instead, I run it as a Home Assistant add-on, which makes sense since Home Assistant runs 24/7 anyway.
Two integrations for the magic to manifest:
- Squeezebox Integration: Discovers and controls piCorePlayer from Home Assistant
- Lyrion Music Server add-on: Provides the server functionality within Home Assistant
Quick tangent: Testing local music led me to discover Qobuz—apparently the place to legally buy DRM-free music files in 2025. Who knew? I grabbed Chillhop Essentials Summer 2025🦝 to test with. It works great, and my daughters love it! 🎶
Putting it all together
Time to transform this collection of components into a seamless experience. Home Assistant automations let you build complex logic with conditions, waits, and state checks. Perfect for our multi-step process:
- Power up piCorePlayer (if it’s off)
- Turn on AV receiver (if it’s off) and wait 2 seconds for boot
- Switch to piCorePlayer input (if it’s not already there)
- Set comfortable volume (30% works for us)
- Wait for piCorePlayer to become available
- Start playing the requested music
Since steps 1-5 are universal, I created a reusable “Prepare AVR and piCorePlayer” automation:
id: '123456789abcd'
alias: Prepare AVR and piCorePlayer
description: >-
  Switches Pioneer AV Receiver on, sets it to piCorePlayer, then sets volume to 30%
triggers: []
conditions: []
actions:
  # Turn on piCorePlayer's smart plug if needed
  - if:
      - condition: device
        type: is_off
        device_id: <piCorePlayer smart plug device ID>
        entity_id: <piCorePlayer smart plug entity ID>
        domain: switch
    then:
      - type: turn_on
        device_id: <piCorePlayer smart plug device ID>
        entity_id: <piCorePlayer smart plug entity ID>
        domain: switch

  # Turn on AV receiver if needed
  - if:
      - condition: state
        entity_id: media_player.pioneer_avr_main_zone
        state: 'off'
    then:
      - action: media_player.turn_on
        target:
          device_id: <Pioneer AV receiver device ID>
      - delay:
          seconds: 2

  # Switch to piCorePlayer input if needed
  - if:
      - condition: not
        conditions:
          - condition: state
            entity_id: media_player.pioneer_avr_main_zone
            attribute: source
            state: piCorePlayer
    then:
      - action: media_player.select_source
        data:
          source: piCorePlayer
        target:
          device_id: <Pioneer device ID>
      - delay:
          seconds: 1

  # Set volume
  - action: media_player.volume_set
    data:
      volume_level: 0.3
    target:
      device_id: <Pioneer device ID>

  # Wait for piCorePlayer to boot up if needed
  - if:
      - condition: state
        entity_id: media_player.picoreplayer
        state: unavailable
    then:
      - wait_template: not is_state('media_player.picoreplayer', 'unavailable')
        timeout: '00:01:30'
mode: single
Then individual station automations become simple:
id: '123456789abcd'
alias: Play SomaFM Groove Salad
actions:
  - action: automation.trigger
    data:
      skip_condition: true
    target:
      entity_id: automation.prepare_avr_and_picoreplayer

  - action: media_player.play_media
    data:
      media_content_id: some_somafm_id.0
      media_content_type: app-somafm
    target:
      entity_id: media_player.picoreplayer
Pro tip: Use Home Assistant’s automation GUI for setup—the device and media pickers make finding the right IDs much easier than guessing! 🎯
Triggering your automation
Great! Now I just need a simple way to trigger these automations. Home Assistant dashboards work, but require apps and credentials. Physical buttons exist (Flic buttons are nice) but need batteries and complex integration.
Enter NFC cards: €10 for 20 cards on Amazon, work with any phone, no batteries, no apps required ✨.
The trick is using Home Assistant webhook triggers. As a Home Assistant Cloud subscriber, I get publicly accessible webhook URLs. Just be careful who you share them with—you don’t want strangers controlling your home! 🔒
I built one generic automation that accepts media parameters via webhook URLs:
id: '123456789abcd'
alias: Play Webhook with media ID
description: >-
  Generic automation that plays any media ID passed via webhook parameters
triggers:
  - trigger: webhook
    allowed_methods:
      - GET
    local_only: false
    webhook_id: PlayTrackWithID_<your_secret_webhook_id>
actions:
  # Prepare everything
  - action: automation.trigger
    data:
      skip_condition: true
    target:
      entity_id: automation.prepare_avr_and_picoreplayer

  # Play media from URL parameters
  # Example: https://your-domain/webhook_id?id=station_id&type=app-somafm
  - action: media_player.play_media
    data:
      media_content_id: '{{trigger.query.id}}'
      media_content_type: '{{trigger.query.type}}'
      enqueue: replace
    target:
      device_id: <piCorePlayer device ID>

  # Enable shuffle and repeat for playlists
  - action: media_player.shuffle_set
    data:
      shuffle: true
    target:
      device_id: <piCorePlayer device ID>

  - action: media_player.repeat_set
    data:
      repeat: all
    target:
      device_id: <piCorePlayer device ID>
Remember to URL-encode your media IDs! Use something like urlencoder.org for radio station URLs.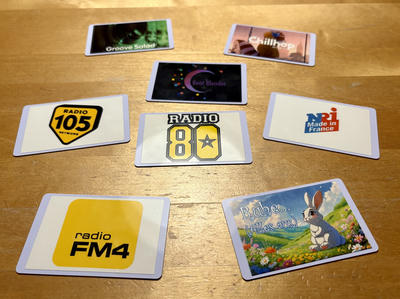
Making it beautiful: I put my HP Sprocket printer to work creating colorful station logos for each card. Now my family knows exactly what they’re getting when they tap! The printer took an hour to reconnect to my iPhone (why do these things forget pairing so eagerly?) but the result was worth it 🖨️.
The system works great now: tap card, music starts, family happy! ✅
A better NFC scanning user experience
Technical success, UX failure: scanning NFC cards triggered webhooks that returned empty responses, making phones display cryptic “download this?” dialogs. Not exactly user-friendly 📱😕.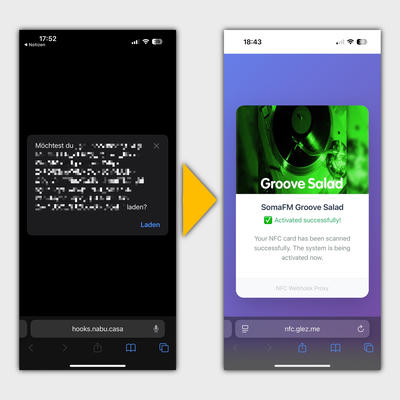
Solution: Build a webhook proxy! I spent 30 minutes brainstorming a plan with Claude on my phone, then another 1-2 hours with Claude Code to build and deploy it.
The proxy:
- Generates clean, UUID-based webhook URLs for NFC cards
- Maps them to the actual Home Assistant webhooks
- Returns beautiful confirmation pages with station logos
- Prevents accidental re-triggers from browser reloads
Find the complete implementation in my webhook-proxy repository on GitHub—it runs on AWS S3 and CloudFront for maximum simplicity 🚀.
Final thoughts
Mission accomplished: One tap now reliably starts music through my good speakers! 🎉
But here’s the real takeaway: the complexity is the point. Sure, I spent six weeks automating something I could do with three “Alexa” commands. But along the way I learned about:
- Network protocol archaeology (telnet in 2025! 📞)
- Power supply physics (those undervoltage warnings taught me more than textbooks)
- WiFi broadcast packet behavior (Range Extender vs Client mode matters!)
- The beauty of optical audio (Toslink never negotiates, it just works)
- The Raspberry Pi audio ecosystem (piCorePlayer is just the beginning)
- Home Assistant automation (now I have a dozen other ideas in mind)
- NFC user experience design (cryptic URLs bad, pretty confirmations good)
The real reward isn’t the automation—it’s understanding how these systems work. That knowledge applies everywhere: your next IoT project, debugging networking issues at work, choosing the right architecture for reliability over features.
What’s next for you? Start simple, embrace the rabbit holes, and remember that every frustrated debugging session is actually a masterclass in system design. Consider building:
- Mood-based music (different playlists for different times of day) 🌅🌙
- Smart device chains (turn off everything when switching inputs)
- Pet entertainment (automated music while you’re away) 🐕
- Security simulation (random music to fake occupancy) 🏠
- Creative NFC uses (lighting scenes, device controls, anything!)
The beauty of home automation isn’t eliminating complexity—it’s making that complexity work for you instead of against you. Every “simple” button press is really a symphony of protocols, state machines, and logic flows working in harmony.
So go forth and automate! Your next “simple” project is waiting to teach you something amazing 🌟.
What rabbit hole will you fall into next? 🐰⚡